This tutorial will base itself on everything else. If you have not currently read the 10 Frame Hive Body or the Solid Bottom Board please do so. I will not be going into how to cut out the frame rest, etc so be comfortable with the previous material. You will have the option of either using 3/4" plywood for the bottom board or 7/8" Pine. I prefer the exterior ply floor, as this project uses up 7' 7 7/8" of pine board. This means
you should get 22 Nuc Boxes out of 13 twelve foot boards, a sheet of plywood, with scrap leftover.
Cost (22 Nucs):
Rough Pine x13@$1.15 (1x12x7/8) = $179.40
Exterior Plywood 1@$36.52 = $36.52
Total: $215.92
/per Nuc $9.81
The material for this is our favorite barn board 1x12x1. Plane one side down to 7/8, or buy it in 7/8s (depends on your source whether or not its 7/8" or 1")
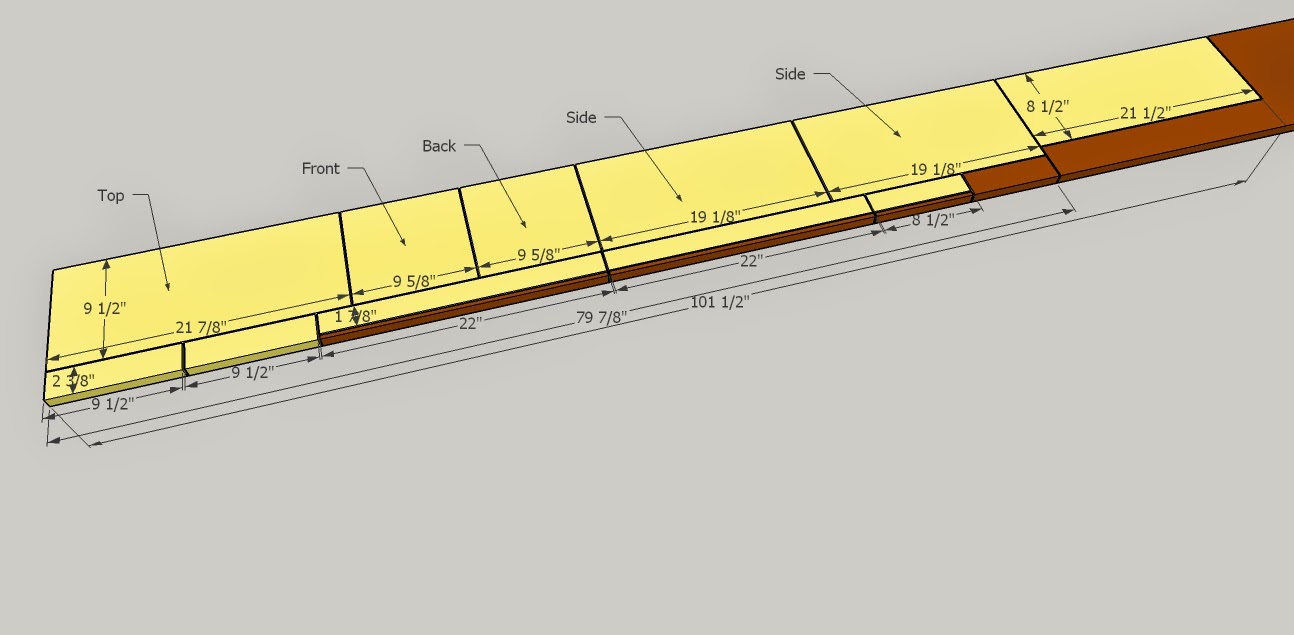
This cut list is pretty complicated, so pay close attention. Click on the images to enlarge. (Correction, Top is 20 1/8" sorry for the confusion)
Note: Dark brown denotes scrap.
Begin by cutting your board to 79 7/8" (or 80"). Setup your fence to 9 1/2" and rip the lumber. Now you have a large piece which contains the majority of the components, and a strip that contains the handles for the top, and rails for the bottom board. Despite the plan showing 2" handles for the top cover, leaving them at 2 7/8" is fine. Cut them out of your strip.
Next, depending on whether you use 3/4" Exterior Ply for your bottom board, or 7/8" Pine you want to rip the remaining strip of wood to:
Plywood 3/4" - 1 7/8"
Pine 7/8" - 2"
Continue cutting all the components out.You should end up with
Hive Body
Front/Back - 9 1/2" x 9 5/8" x 7/8" (2)
Side - 19 1/8" x 9 5/8" x 7/8 (2)
Top Cover
Top - 20 1/8" x 9 1/2" x 7/8"
Handle - 9 1/2" x 2" x 7/8" (2) (or 9 1/2" x 2 3/8" x 7/8" if you dont rip them down, I wouldn't bother ripping them.)
Bottom Board
Side Rails - 22" x 1 7/8" x 7/8" (2) (or 22" x 2" x 7/8 if you use pine for the floor)
Back Rail - 8 1/2" x 1 7/8" x 7/8"
Floor - 21 1/2" x 8 1/2" x 3/4" (same dimensions if using 7/8" pine)
Top Cover
Simply assemble the handles to the top using screws, nails, staples, and/or glue.
Bottom Board
The side rails, and back rail will have to be grooved to accept the floor. This is covered in the previous tutorial on Solid Bottom Boards. If you elect to go with a 7/8 pine board for the floor your overall height will be 2", and the groove thickness increased to 7/8" with the 3/4" and 3/8" remaining the same.
Next rabbets are made in the side rails. Make sure to line them up and mark the tops as they are non reversible (in the tutorial I believe I rabbeted the back rails, feel free to follow either way, less mess ups doing the back rail).
Insert the floor, and assemble using your choice of fasteners.


No comments:
Post a Comment