Monday, November 10, 2014

Build Your Own - 6 Frame Nuc


This 6 Frame Nuc is designed for use with the 3 Frame by 4 Compartment Queen Castle I designed. For detailed construction information refer to the tutorial in How to Build: 5 Frame Nuc.

This 6 frame nuc is not standardized equipment. It is slightly over-sized for a six frame, however it works just fine. Use it on its own, or in conjunction with the Queen Castle I designed.

Using our favourite stock material -barn boards (also known as 1x12). Cut out the specified material. You will need a piece 8' 6 5/8".


Start by cutting out the 20 1/8" by 11" and the 21 1/2" by 10" sections crosswise with a mitre saw. Then adjust your table saw's fence to 9 5/8" and rip the rest of the material. After accomplishing this set the fence to 1 7/8" and rip the strip you just took off as well as the 21 1/2" by 10" piece. This is the most efficient way to do it. Afterward set the fence to 11 inches, and using your mitre saw finish all the required cuts.

Nuc Box

Front/Back (2) - 9 5/8" x 11"
Sides (2) - 9 5/8" x 19 1/8"

Top Cover

Top - 11" x 20 1/8"
Handles (2) - 11" x 1 7/8"

Bottom Board
Floor - 10" x 21 1/2"

Side Rail (2) - 1 7/8" x 21 1/2"
Back Rail - 1 7/8" x 11"

Now simply make your required rabbet joints, dado cuts, and frame rest as described in other tutorials. For the bottom board, I changed the method of construction to the one used in Build Your Own: Solid Bottom Board to maximize lumber use.

Build Your Own: Queen Castle - Three Frames by Three


This is simply for reference, follow the directions for the Two Frames by Four Queen Castle. There are a few differences.

Dividers - You will need three 1/4" dividers cut at 19 1/8" x 10 1/2"
Inner Covers - Two at 19 1/8" x  4 3/4" and one at 19 1/8" x 4 7/8"

Three frame queen castles allow the queen to build out a little more, allowing the beekeeper more time before they overflow and begin swarming preparations. If you sell nucs, a four frame nuc would simply be one of these compartments, plus a frame of empty comb/foundation. If you take out a divider you will be able to put in seven frames, however it is very tight.

If you take a Solid Bottom Board  and run two dividers down the middle  to the end of the landing board to correspond with the Queen Castle dividers it can make a great landing board. I know a queen breeder that uses these, and paints each divided landing board a separate colour. I could see problems with queens entering the wrong entrance. Otherwise simple cut holes on three separate sides for entrances.

Build Your Own: Queen Castle Two Frame by Four


Here is a requested Queen Castle setup. It is a modified standard deep box, so your top cover will work with it. For a bottom board the easiest method would be to fasten a piece of plywood to the bottom. If I get ambitious enough I will make plans for a fancy bottom board so you can forgo cutting holes in the box. This plan assumes you are comfortable with making your own deep, if not check out the tutorial Build Your Own 10 Frame Hive Body.

It is in principal the exact same as a deep hive body except it is taller to accommodate individual wooden inner covers, and has additional dado cuts in the front and back to accept dividers. This queen castle plan uses same size compartments as opposed to other plans that typically have odd sized ones.

You will need:

Rough Pine
Sides - (2) 19 1/8" x 10 1/2" x 7/8"
Front/Back - (2) 16 5/8" x 10 1/2" x 7/8"
Inner Covers - (4) 19 1/8" x 3 1/2" x 7/8"

Plywood Dividers
(2) 19 1/8" x 10 1/2" x 1/4"
(1) 19 1/8" x 10 1/2" x 7/16" (if you cannot find 7/16" plywood, use 3/8" or take 1/2" and sand the ends down to fit)

Floor
(1) 19 1/8" x 16 5/8" (can be made out of anything, plywood works great, just screw evenly to the bottom)

*Sorry, been way to busy making these plans I have not had time to draw out a cutlist for you.


Next create all the dado and rabbet cuts to these dimensions. This may take some time and forethought to accomplish so I suggest laying it out in pencil before attempting to cut it.

When this is accomplished take your sides (they dont need any work done to them yet) and assemble the box.

 Next cut your dividers to these dimensions. You will need two 1/4" pieces, and one 7/16" (or 3/8"). Insert these into box. Do not bother fastening them. Removing them can create different spaces, and configurations to suit your needs.


Take scrap, or rip a 3 1/2" strip of 7/8" pine. Really any thickness will work for the inner covers.

Now take a drill and make a 3/4" to 1" hole for each compartment. Add your dividers attach a floor and you are on your way to making queens.


Variation


For those wanting to use a standard depth hive body. I have included these additional measurements. The inner covers sit on top of the frames, allowing bee passage underneath, whereas the above design does not allow that. This is very similar to the Brush Mountain Queen Castle.


All the measurements for your dividers remain the same. The hive body itself is standard 9 5/8" depth. You will however need to change:

Inner Cover
(2) - 20 1/8" x 4 3/8"
(2) - 20 1/8" x 3 1/2"

Sunday, November 9, 2014

Build Your Own - Medium Hive Body

 I am going to cheat you guys on this one and not provide a tutorial. If you are confused follow the Build Your Own: Deep Hive Body tutorial.

The process is the exact same with the exception of a 6 5/8 depth instead of 9 5/8. I do not recommend using my typical choice of 1 by 12 rough pine as it leaves a great deal of waste. Instead call around to lumber mills and enquire if you can purchase 1 by 8 rough pine (they will probably have it).

Build Your Own: Insulated Top Cover


Admittedly, I haven't built this one yet. However I did design it. This is a telescoping top cover with the addition of 1.5 inches of rigid foam insulation. Its total R-Value is about R-8.75. Normal top covers have an insulation value of less than 1.

Materials

Pine (at least 3 3/4" wide, and 81 1/8" long)
Ext Plywood 3/4" - 22 1/2" by 18 7/8"
Plywood 1/4" - 22 1/4" by 17 7/8"

Like all project I am going to assume you are using our favourite barn board. So get that table saw out, and rip a strip off 3 3/4"


Discard the larger piece. Now create the recess which holds the insulation.


Now cut that strip into our required parts. You will need:
  • (2) 18 7/8"
  • (2) 21 1/2
Next take the 18 7/8" pieces, and we are going to add a rabbet joint to each end.


That finished, it is time to assemble the basic frame using whatever fasteners you choose (nails, staples, screws, glue).

Next place the piece of 1/4" plywood (22 1/4" by 17 7/8") in the recessed area. Although it is not necessary to fasten it, I would recommend it.


Place the rigid insulation in the recess. Once again, not necessary to fasten it, but using some adhesive could be beneficial.


Fasten the plywood top, and you are away to the races. You may wish to wrap the hive in aluminum flashing for weather protection. That is a different tutorial however.


Build Your Own: Entrance Reducer

Correction: Proper length for entrance reducer is 14 1/2"

Nothing goes to waste in a beekeepers workshop! Entrance reducers can be made from commonly destined for the wood pile. This one features two different entrance, one at 1" and another at 3" depending on your needs (or the bees for that matter).


One tip, is it can be useful to taper by the top and the back side (relative to the picture). Sometimes you will find the reducer just does not want to fit (moisture in wood equals expansion). This can alleviate that problem. All it takes is a hand planer, even your hive tool or pocket knife can take off just a bit.


 Just 1/16" to 1/8" can be just enough to create problem free entrance reducers. I just did the end for demonstration.


Build Your Own: Combination Bottom Board


Many supply stores now carry what is called the Combination Bottom Board. They charge an exorbitant amount of money for them, they are typically combining the idea behind a screened and a solid bottom board. They also usually feature one set of rails with various grooves cut out of them. This can make them very weak. Using the plans from both tutorials Screened Bottom Board, and Solid Bottom Board we can come up with a much better, cheaper, and more useful solution (lets not reinvent the wheel).

First take your screened and solid bottom boards.
 Now put them in reverse directions, and make sure both 3/8" entrances are facing each other.

Solid Bottom Board 3/8" up
Screened Bottom Board 3/8" down

Put them on top of one another.


This leaves you with a gap of 3/4". This is exactly the space that an entrance reducer will fit into. So lets take a spare entrance reducer, and using tacks/glue/tape (whatever really) attach a mite board to it. Anything of the right size will work, cover it in vaseline or your choice of "make the mites stick the board" solution. Put the sticky board / entrance reducer into the gap. I place the entrance opening up to allow ventilation, but it is your choice.


Now we have a fancy combination bottom board without the heavy bill for one. In addition we have extra bottom boards at the apiary, a way to do mite counts, and a spare entrance reducer all in one hive. Cheers!


Build Your Own: 5 Frame Nuc


This tutorial will base itself on everything else. If you have not currently read the 10 Frame Hive Body or the Solid Bottom Board please do so. I will not be going into how to cut out the frame rest, etc so be comfortable with the previous material. You will have the option of either using 3/4" plywood for the bottom board or 7/8" Pine. I prefer the exterior ply floor, as this project uses up 7' 7 7/8" of pine board. This means
you should get 22 Nuc Boxes out of 13 twelve foot boards, a sheet of plywood, with scrap leftover.

Cost (22 Nucs):
Rough Pine x13@$1.15 (1x12x7/8) = $179.40
Exterior Plywood 1@$36.52 = $36.52

Total: $215.92
/per Nuc $9.81

The material for this is our favorite barn board 1x12x1. Plane one side down to 7/8, or buy it in 7/8s (depends on your source whether or not its 7/8" or 1")

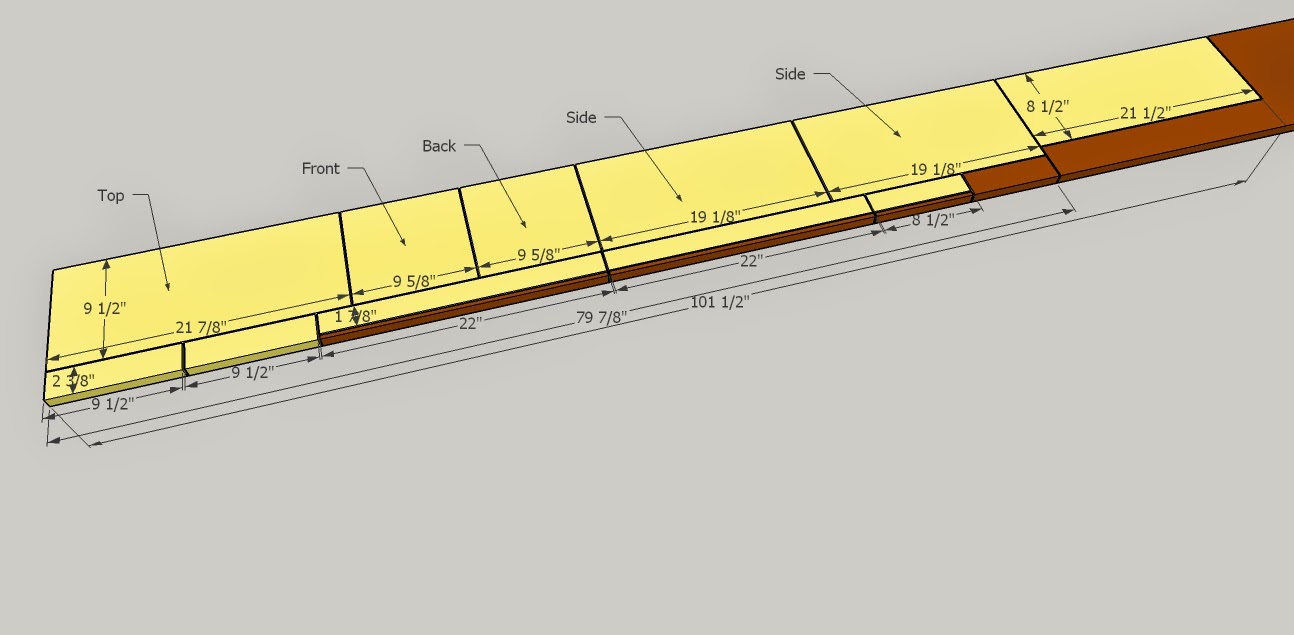
This cut list is pretty complicated, so pay close attention. Click on the images to enlarge. (Correction, Top is 20 1/8" sorry for the confusion)


Note: Dark brown denotes scrap.

Begin by cutting your board to 79 7/8" (or 80"). Setup your fence to 9 1/2" and rip the lumber. Now you have a large piece which contains the majority of the components, and a strip that contains the handles for the top, and rails for the bottom board. Despite the plan showing 2" handles for the top cover, leaving them at 2 7/8" is fine. Cut them out of your strip.

Next, depending on whether you use 3/4" Exterior Ply for your bottom board, or 7/8" Pine you want to rip the remaining strip of wood to:

Plywood 3/4" - 1 7/8"
Pine 7/8" - 2"

Continue cutting all the components out.You should end up with

Hive Body
Front/Back - 9 1/2" x 9 5/8" x 7/8" (2)
Side - 19 1/8" x 9 5/8" x 7/8 (2)

Top Cover
Top - 20 1/8" x 9 1/2" x 7/8"
Handle - 9 1/2" x 2" x 7/8" (2) (or 9 1/2" x 2 3/8" x 7/8" if you dont rip them down, I wouldn't bother ripping them.)

Bottom Board
Side Rails - 22" x 1 7/8" x 7/8" (2) (or 22" x 2" x 7/8 if you use pine for the floor)
Back Rail - 8 1/2" x 1 7/8" x 7/8"
Floor - 21 1/2" x 8 1/2" x 3/4" (same dimensions if using 7/8" pine)

Top Cover


Simply assemble the handles to the top using screws, nails, staples, and/or glue.

Bottom Board


The side rails, and back rail will have to be grooved to accept the floor. This is covered in the previous tutorial on Solid Bottom Boards. If you elect to go with a 7/8 pine board for the floor your overall height will be 2", and the groove thickness increased to 7/8" with the 3/4" and 3/8" remaining the same.


Next rabbets are made in the side rails. Make sure to line them up and mark the tops as they are non reversible (in the tutorial I believe I rabbeted the back rails, feel free to follow either way, less mess ups doing the back rail).


Insert the floor, and assemble using your choice of fasteners.


Nuc Hive Body

Pretty straight forward, use the instructions in the tutorial on 10 Frame Deep to rabbet out the front and back pieces to receive the sides, and add the frame rest, as well as the handles. After that is completed Assemble.

Build Your Own: Shoulderless Frame

My first year, I bought six single deeps. Each had nine frames. However something was weird about those frames, they were not self spacing frames like I was commonly used to. I thought I got ripped off. However I came to think about it over the years and learned to love shoulderless frames. Sure, its a little more work to space them out but they do have many benefits.

 They are quite easy to build, unlike the fancy milled store bought ones; and they can be made from scrap. Used in a honey super, they are extremely easy to uncap. They would great in nine frame, ten frame, and even eleven frame configuration. Many Michael Bush followers testify to small cell, 1 1/4" comb spacing in the brood box. Consequently they spend a great deal of time cutting down perfectly good frames. This way you can space them as you would like, and you arent making equipment unusable if you switch back to common 1 3/8s spacing. They are also OLD SCHOOL, so if you want to be a hardcore beekeeper, you have to keep it old school!

There are many possible cut list for this project that are more efficient, I showed the easiest one. I will elaborate on that later.

Step One


 You will require a strip of wood of 1" thickness (7/8" will also work fine, just make minor adjustments on the bottom bar), 35 1/2" long, and 1 1/4" wide. Set the fence on the table saw to 3/4" and rip the board down into 3/4" and 3/8" strips.

It is much more efficient if you have a piece 1 3/4" wide stock wood, this way you can rip an additional 3/8" strip which will equal one frame every 19".Just add another 1/8" inch saw cut, and another 3/8" strip of wood in addition to the picture.

If you are running many of these off however just keep running off 3/4" and 3/8" strips.

Step Two- Sizing it all up


Cut the various lengths from your strips of wood.

Top Bar - 19"
End Bar - 8 3/4" (2)* 
Bottom Bar - 17 3/4"

*5 7/8" for Mediums, 5" for Shallows


Set the fence to 7/8" and run your bottom bar through, this will take off 1/8"

Step Three - Top Bar

 Begin by cutting out the part of the frame that sits on the frame rest using a table saw, or router to the proper dimensions. Cut the one inch part first, as we will need a blade depth of 3/8" for the next step (save time).

 Set the fence of your table saw to 7/16" if you want to be perfect. Otherwise set it to 1/2 inch. Adjust the blade depth to 3/8" (if it is not already there).

Step Four - Bottom Bar


Adjust the depth of the saw blade to 1/4" and the fence to 3/8". Run the bottom bar through creating the slot for foundation.

Step Five - End Bars


Despite the easy cut, be careful cutting out the bottom of the end bars. 1/16" does not leave a great deal of room for failure. The cut above is a depth of 3/8". If you are having problems keeping tight tolerances consider reducing the width of the bottom bar to 3/4". This will leave you with 1/8" on either side.

Step Six - Assemble


Saturday, November 8, 2014

Build Your Own: Honeydrunks Queen Castle

This has been an idea I have been toying with for some time. After watching Michael Palmers dual nuc setup I was inspired to... well think about new ways to go about things. One thing I didnt like about Palmers setup was the need for little mini four frame nucs. They are a little to small to use as a nuc on its own (unless you manage intensively like Palmer, and it was just another piece of non standard equipment. So I got thinking. Many people opt for three compartment by three frame queen castles: offers a little more room for them to grow and not swarm if you are a little late, uses a standard hive body (for the most part). I still was not sold. I do however use six frame in addition to five frame nucs. So my quest was to make a queen castle, that could be converted into a double nuc, and six frame nuc bodies could be added for overwintering or letting them grow out. Step into Honeydrunks Queen Castle. Lots of math in this baby. Beespace respected as much as possible but concessions were made.

Typical Queen Castle, 1/4 inch dividers, and a 1" divider in the centre.
Close up of dividers

Inner Covers in place

Top Cover added, uses same top cover for 6 frame Nuc
Six frame Nuc added on top.

Showing half Queen Castle configuration, and half Double Nuc with one deep six frame Nuc body.